
Facebook is a powerful platform for individuals and businesses to connect with friends, family, and customers. Having a Facebook page allows you to establish your online presence and reach a wider audience. However, as circumstances change, you may find the need to modify your page’s name to accurately reflect your brand or personal identity.
Guidelines for Changing Your Page’s Name
Before diving into the process of changing your Facebook page’s name, it’s essential to understand the guidelines set by Facebook. These guidelines ensure that the name change process is fair, transparent, and aligns with Facebook’s policies. Here are some important considerations:
i. Page Naming Policies
Facebook has specific rules regarding the naming of pages. Your page’s name should accurately reflect the content and purpose of the page. It should not contain misleading information or violate any trademark or copyright laws. Additionally, your page’s name should not include excessive capitalization, symbols, or unnecessary punctuation.
ii. Regional and Global Pages
If your page falls under a global page, you may have limitations on changing the name. Facebook differentiates between regional pages and global pages. Regional pages are associated with specific locations, while global pages are broader in scope. If your page is a regional page, you may not be able to change its name independently.
iii. Recent Name Changes
Facebook has restrictions on frequent name changes to prevent misuse or confusion. If you or someone with access to your page has recently changed its name, there may be a waiting period before you can request another change. This waiting period ensures stability and prevents abuse of the name change feature.
How to Change Your Page’s Name on Facebook
Now that you understand the guidelines, let’s dive into the step-by-step process of changing your Facebook page’s name. You can follow these instructions on a computer, mobile browser, or through the Facebook mobile app for iOS or Android.
Step 1: Log into Facebook and Access Your Page
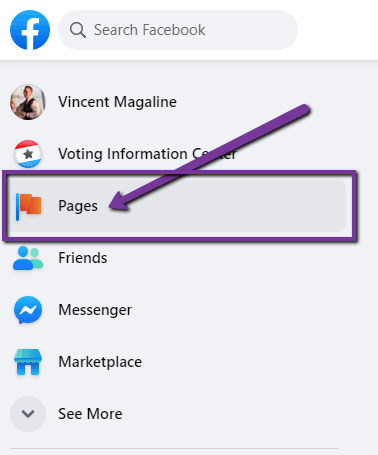
Start by logging into your Facebook account using your credentials. Once logged in, navigate to your Facebook page. You can find your page by clicking on the pages tab in the left-hand menu or by searching for your page in the search bar at the top of the page.
Step 2: Access Page Settings
On your Facebook page, click on the “Settings” tab located at the top right corner of the page. This will take you to the settings menu, where you can make various changes to your page’s configuration.
Step 3: Edit Your Page’s Name
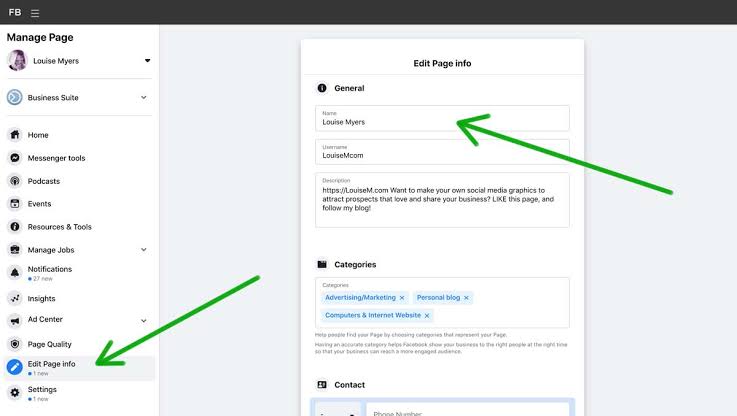
In the settings menu, scroll down until you find the “Page Info” section. Click on the “Edit” button next to your page’s name. This will open a dialog box where you can enter your new desired page name.
Step 4: Review and Submit Your Request
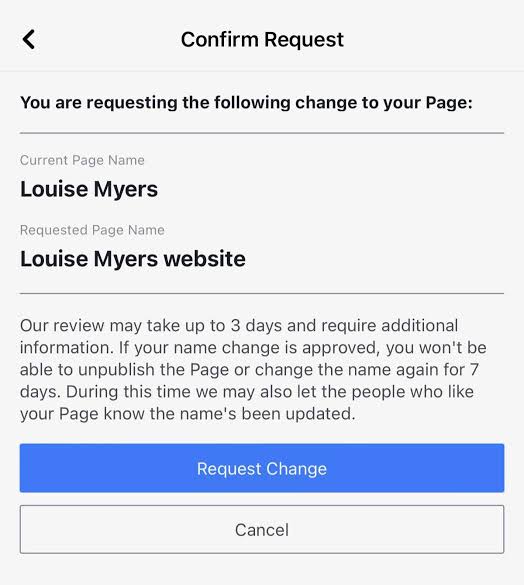
Carefully review the name change you entered in the dialog box. Make sure it adheres to Facebook’s guidelines and accurately represents your page. Once you are satisfied, click on the “Continue” button to submit your name change request.
Step 5: Wait for Approval
After submitting your name change request, Facebook will review it for compliance with their policies. This review process typically takes a few days, during which you won’t be able to edit your page’s name. Facebook will notify you via email or a notification on your page once your request is approved or rejected.
Step 6: Monitor Your Page
While waiting for approval, keep an eye on your page and any notifications you receive from Facebook. If your request is rejected, Facebook will provide a reason for the rejection. You can then make the necessary changes and resubmit your request.
Troubleshooting: What to Do If You Can’t Change Your Page’s Name
In some cases, you may encounter issues or limitations when trying to change your Facebook page’s name. Here are a few troubleshooting steps to consider:
i. Check Your Page Access and Role
Ensure that you have the necessary access and role on the page to change its name. If you don’t see the option to edit your page’s name, it’s possible that you don’t have the required permissions. Refer to Facebook’s help center to learn how to view your page access and role.
ii. Verify Recent Name Changes
If you or someone else recently changed your page’s name, you may need to wait for a specific period before requesting another change. Facebook imposes limitations to prevent frequent name changes and maintain stability.
iii. Consider Regional Page Limitations
If your page is a regional page associated with a global page, you may not be able to change its name independently. In this case, consider reaching out to the administrators of the global page for assistance.
If you have followed all the guidelines and troubleshooting steps and still can’t change your page’s name, you can reach out to Facebook’s support for further assistance.
Conclusion
Changing the name on your Facebook page is a straightforward process that requires careful adherence to Facebook’s guidelines. By following the steps outlined in this guide and considering the troubleshooting tips, you can successfully update your page’s name to reflect your brand or personal identity. Remember to review Facebook’s policies and guidelines to ensure compliance and a smooth name change process.